Stereo Microscope Vs Compound Microscope
Similarities & Differences
Similarities
Magnification
As the names suggest both stereo and compound microscopes are instruments used to magnify or enlarge the images of small objects to a scale that allows for better examination and analysis.
Using either microscope, users can increase the level of magnification in order to get a better view of specific details of interest. While the level of magnification varies between the two, they both make it possible to magnify the image of small objects to the point where they are sufficiently clear and visible in order to be analyzed.
Both are Optical Microscopes
Both the stereo and compound microscope are optical microscopes which means that they use visible light. While the terms compound microscope and optical microscope are often interchanged, it's worth noting that a stereo microscope is also a type of optical microscope given that it uses visible light.
Essentially, visible light refers to the light that in the electromagnetic spectrum falls between the infrared and ultraviolet light. As such, it has a wavelength of between 380 and 740 nanometers (1.5 to 2.9 × 10⁻⁵ inches). While this light allows for small objects to be highly magnified using a set of lenses, one of the biggest limitations of using this type of light (in microscopy) is the fact that it can't be used to produce images of objects that are smaller than half the wavelength of the light used.
Prisms and Objective Lenses
While these components vary in stereo and compound microscopes, they can be found in both devices and basically have the same functions. In binocular microscopes, prisms, which are polished blocks made from transparent materials (e.g. glass), are typically used for the purposes of deviating light as well as inverting/rotating images. They play an important role in directing the light.
In addition to the prisms, both stereo and compound microscopes have objective lenses in place. These may be described as optical elements that gather and focus light from the object under investigation and are therefore involved in the production of a real image.
Given that objective lenses focus rays of light and also gather light from the object, they are the closest elements to the specimen.
Some of the other similarities between stereo and compound microscopes are related to the parts of the microscope.
The following components can be found in both microscopes:
· Eyepiece/ocular lenses - This is the part of the microscope through which an observer views the image of the object under investigation. This component of the microscope is contained in the eyepiece tube where it is positioned above the objectives.
Depending on the microscope and intended use, the eyepieces vary in power and also contribute to the total magnification.
· Focus wheel - Both the stereo and compound microscopes have a focus wheel in place that serves to bring given parts of the object/specimen into focus. By turning the focus wheel, the observer can bring any part of the image into focus to make the image clear.
· Stage - Both the compound and stereo microscopes have a stage in place. This is the part of the microscope on which the object/specimen to be viewed is placed so that it can be illuminated.
Differences between Stereo and Compound Microscopes
Magnification
One of the main differences between stereo and compound microscope is the fact that compound microscopes have much higher optical resolution with magnification ranging from about 40x to 1,000x.
Stereo microscopes have lower optical resolution power where the magnification typically ranges between 6x and 50x. Because of this difference, stereo microscopes cannot be used for viewing very small details (microscopic) of small specimen.
Here, it's worth noting that the total magnification is the product of eyepiece magnification, power of the ocular lens, and power/magnification of the objective lens. While the two types of microscope have objective lenses and the eyepiece, the difference in the total magnification is due to the differences in their magnification powers. In a stereo microscope, for instance, magnification of the eyepiece is usually 10x.
Magnification of the objective lens, on the other hand, ranges from 0.7x to 5x. In the event that the observer is using the 10x eyepieces and sets the 5x objective lens in place, then the total magnification would be 50x.
Apart from the two types of lenses, some stereo microscopes may have auxiliary lenses that can be used to increase the total magnification. In this case, the magnification of the auxiliary lens is included in the calculation to obtain the total magnification.
Compared to the stereo microscope, the eyepiece and objective lenses have a much higher magnification power that provides very high magnification. For most compound microscopes, magnification power of the eyepiece ranges between 10x and 15x. As well, the magnification power of objective lenses ranges from 4x to 100x.
In this case, assuming that the observer uses the 10x and sets the 100x objective in place, the total magnification would be 1000x
* Because of the high magnification of a compound microscope, it's possible to use this particular microscope to observe objects (e.g. bacteria) that cannot be seen with the naked eye. In comparison, stereo microscopes are well suited for viewing larger objects.
Depth of Perception
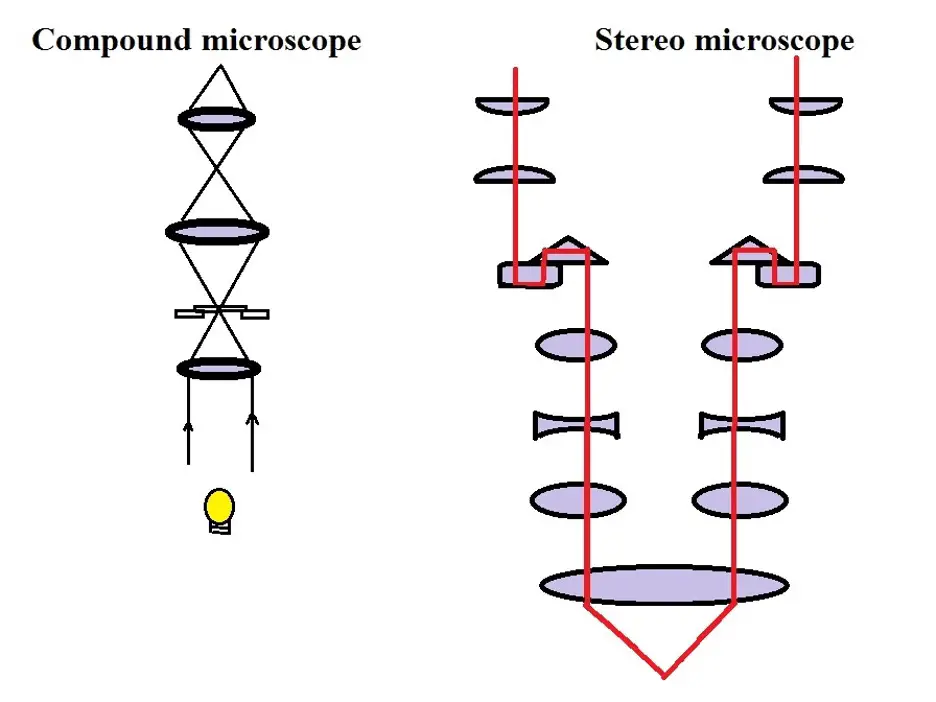
One of the main strengths of a stereo microscope is the fact that it allows for a three-dimensional view of the object. Unlike a compound microscope, stereo microscopes are designed in such a manner that they have separate optical pathways for each of the eyepiece.
For this reason, when an observer is looking through the binocular eyepiece, the separate light paths image the object at different angles (stereo vision) that produces a three-dimensional view typically associated with these microscopes.
* As compared to a compound microscope where only one objective can be used at a time, the 3D dimensional image produced by a stereo microscope is also the result of two objective lenses which are used at the same time.
The following images represent the general path of light in a stereo and a compound microscope:
Given that the different optical paths in a stereo microscope create depth perception for a three-dimensional view, this makes the microscope ideal for studying and manipulating larger objects.
Because they allow for a 3D viewing of the object, these microscopes are commonly used for the purposes of observing and repairing circuit boards. However, they can also be used for the purposes of viewing different parts of insects, plants, and crystals among many other items.
* In the case of a compound microscope, other techniques have to be added to try and produce 3D images of the specimen.
Working Distance
The working distance refers to the distance between the objective lens to the uppermost surface of the specimen (or the surface of the coverslip). As such, the working distance, in microscopy, may be defined as the designated distance between the objective lens and the top surface of the object/specimen required for the sample to come into focus.
While this distance is available in both compound and stereo microscopes, the working distance is much longer in stereo microscopes compared to that of compound microscopes.
In a stereo microscope, the working distance ranges from about 20 to 150 millimeters (depending on the microscope) which not only accommodates larger specimen, but also provides enough room to manipulate these large specimen for the purposes of dissection and repair, etc.
For instance, using a stereo microscope, it's possible to place such objects as leaves, thin branches, large insects, rocks, and even circuit boards, etc on the stage for observation. At the same time, these objects can be slowly moved/manipulated in order to study different parts of interest.
For a compound microscope, the working distance is generally shorter, but also varies with the objective used. Whereas a working distance of 4.0mm is used at 10x, the working distance at 100x is about 0.13mm. This means that as magnification increases, the working distance is significantly reduced (the objective lens is much closer to the object/specimen).
In order to increase the working distance of a compound microscope, the stage adjustment knob is often used to move the stage up or down. This is particularly important given that doing so makes it possible to change the distance in order to accommodate the objectives.
For a stereo microscope, the coarse focus knob is used to move the upper part of the microscope (the part consisting of the objective lens, zoom knob, and eyepieces) up or down. This not only increases or decreases the working distance, but also enhances clarity of the image. Therefore, compared to a compound microscope where the stage can be adjusted, this is not the case with many stereo microscopes where the stage is also part of the microscope base.
* The coarse and fine focus knobs also move the stage up and down.
Adjustment Knobs
In both stereo and compound microscopes, there are several adjustment knobs used for different functions. While they both have a coarse adjustment knob (also known as the coarse focus knob), compound microscopes have a fine focus knob in place while stereo microscopes do not.
As already mentioned, stereo microscopes are used for viewing larger objects/specimen while compound microscopes are used to view much smaller details of a specimen. For this reason, a fine focus knob is required in a compound microscope to ensure that the image is in focus at high magnification.
Here, the movements are much slower and controlled which is suitable for smaller details of the specimen. The coarse adjustment knob is suitable for lower magnification and tends to move the stage more rapidly.
Type of Specimen
As mentioned, the working distance of stereo microscope is large enough to accommodate larger specimen/objects like insects, circuit boards, leaves, and rocks, etc. These are particularly larger specimen when compared to the small (e.g. thin leaf cuticles or thin blood smears etc) viewed using a compound microscope.
One of the other differences between the two types of microscope is the fact that they are used to view different types of specimen/objects. Here, stereo microscopes are used to view larger, opaque specimens while compound microscopes are used to view smaller, thin specimens.
In the case of stereo microscopes, the specimen/object is too large to allow light to pass through. As such, they are particularly suitable for viewing surfaces of given objects. Using a stereo microscope, it becomes possible to study the fine hairs, veins, and patterns on a leaf surface or the finer details of a feather.
Using a compound microscope, the specimen has to be sufficiently thin to allow light to pass through. In order to observe the cells of an onion, the technician has to carefully obtain the onion skin which is very thin and translucent. As such, it can let light pass through when it is illuminated during microscopy.
In most stereo microscopes light is reflected from the surface given that it does not pass through the object. Here, then, reflected illumination is often used. Basically, this means that light from the source bounces off the surface of the specimen/object making it possible to magnify and view the surface of the specimen.
In a compound microscope, transmitted light (where the light originates from beneath the specimen) illuminates the specimen (and may pass through the specimen depending on thickness) which makes it possible to observe fine details of the specimen. This results in an image with dark and bright parts which makes it possible to identify areas of interest.
Using the onion skin as an example, parts of the cell (nucleus, cell wall, and membrane) will be darker compared to other parts which makes it possible to study the cell structure.
* While most stereo microscopes use reflected illumination, some modern stereo microscopes are capable of transmitted illumination. In this case, a light source is placed beneath a stage that is transparent. Here, light originates from below the object.
Some of the other differences between stereo and compound microscope include (involving parts of the microscope):
Condenser - In microscopy, a condenser is a lens that serves to focus light onto the specimen from the illuminator (from the light source). The condenser is located just above the light source, but under the sample (in an upright microscope).
As such, it's commonly found in compound microscopes where it focuses light from below onto the specimen above it. Here, however, some stereo microscopes (particularly those used for darkfield microscopy) may also have a condenser and iris diaphragm.
Iris diaphragm - The iris diaphragm is also located near the condenser and is commonly found in compound microscopes. Here, it serves to regulate the amount of light that reaches the specimen.
Objectives - Objectives contain one or more lenses and are involved in collecting light originating from the sample. A compound microscope may consist of 3 to 4 objectives (4x, 10x, 40x, and 100x) that allow users to gradually switch from low to high magnification. Moreover, as mentioned, a single objective can be used at a time.
These objectives can also be easily removed and replaced or cleaned when need be. In a stereo microscope, however, the objectives are part of the microscope head and are therefore fixed in place and so cannot be easily removed.
Microscope slides and coverslips - When using a compound microscope, specimens are often placed on a glass slide for viewing. When using a compound microscope, this is important for a number of reasons. When observing fluids, a slide hosts the fluid in place making it easier to move the sample into position.
Slides make it easier to hand thin sections when they are being viewed. Coverslips hold specimen in place, flatten them and even protect them from contamination, etc. Given that stereo microscopes are used to observe larger samples, slides, and coverslips are not necessary.
Check out MicroscopeMaster’s online help:
Basics of a Compound Microscope
Diagram/Parts/Functions of a Compound Microscope
Beginner Microscope Experiments
Microscope Slides Preparations-Styles and Techniques
Prepared Microscope Slides - Benefits and Recommendations
Return to Stereo Microscope Parts and Functions
Return from Stereo Microscope Vs Compound Microscope to MicroscopeMaster home
References
Jones & Bartlett Learning, LLC. (2014). Introduction to Botany and Microscopy.
Malcolm Storey. (2016). Mycological Microscopy part 1: choosing your equipment.
R. Jordan Kreindler. The Stereo Microscope.
Links
https://www.coris.noaa.gov/activities/cdhc_fieldmanual/pdfs/fm_appendix_8.pdf
https://compleatnaturalist.com/stereoscopes-vs-microscopes/
Find out how to advertise on MicroscopeMaster!
