Snowflakes under a Microscope
Careful Preparation and Observation
Essentially, "snowflake" is a general term commonly used to refer to an individual crystal of ice/snow crystal or numerous snow crystals that come together to form larger crystal puff-balls. For this reason, scientists use the term "snow crystal" in place of snowflake given that it specifically refers to a single ice crystal. Regardless, the two terms are interchanged by a regular person to mean the same thing.
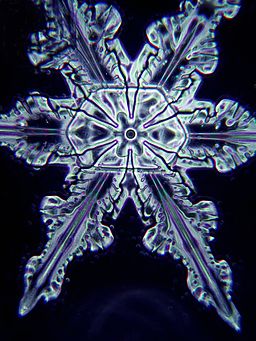
They are formed from water vapor that condenses into ice in the clouds and takes shape as more water vapor molecules freeze on the surface of the seed crystal. Using a microscope, it's not only possible to observe the unique shapes of different snowflakes but also the beautiful patterns of individual crystals.
A Brief History of Studying Snowflakes
The structure and other characteristics of snowflakes have been studied and recorded by several notable figures since before Christ. In 135 BC, a Chinese Scholar by the name Han Yin stated that as compared to the flowers of various plants and trees, the structure of snowflakes always seemed to present a six-pointed symmetry. According to a good number of scholars, this was well known in China at the time. In Europe, however, it was not until many centuries later that various characteristics of snowflakes would start to be recorded.
In 1555, Olaus Magnus (Olaf Mansson), a Scandinavian bishop, described them as having a peculiar variety of shapes ranging from crescent to a shape that resembles a human hand. In 1591, however, Thomas Harriot, an English astronomer, and mathematician gave a better description noting that snowflakes were characterized by a six-fold symmetry.
In 1611, a German scientist by the name Johannes Kepler was more concerned with the general structure of snowflakes which led him to theorize that the hexagonal pattern of stacked cannonballs could help explain the symmetry of snowflakes. However, he could not explain it further due to the limitations of scientific knowledge at the time.
Between the mid and late 1630s, Rene Descartes, a French philosopher, and mathematician, studied snowflakes more closely (also without a microscope) and made incredible observations. As compared to others before him, for instance, Descartes recorded some of the rare forms of snowflakes (e.g. capped columns). Descartes, who had also read the work of Kepler went on to publish his findings, which included illustrations of some of the snowflake shapes he had identified, in autobiographical treatise, Discours de la Méthode.
Although Antoni Van Leeuwenhoek and Robert Hooke are credited as some of the first microscopists to study the structure of snowflakes under a microscope, it is Thomas Bartholin (1660) who used low-power microscopic techniques and produced neat illustrations of the structure of snowflakes. Moreover, he was able to illustrate the atomic packing that helped explain how these structures were formed by building on the works of Descartes and Kepler.
Microscopy made it easier to study the distinct shapes of snowflakes and even classify them into several categories. For instance, in 1681, Donato Rossetti, an Italian philosopher, and mathematician, divided snowflakes into several categories based on their distinct morphological appearance while William Scoresby presented his illustrations in 1820 in an attempt to do the same.
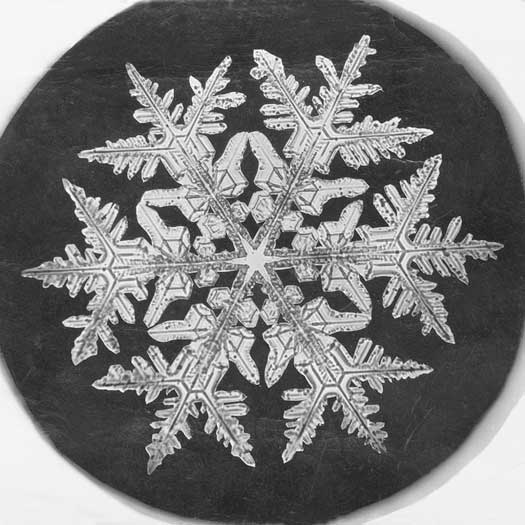
Although many others had imaged snowflakes and made illustrations, Wilson A. Bentley (commonly referred to as the snowflake man or Wilson “Snowflake” Bentley in some books) was able to use his bellows camera (adapted from a microscope) to take a clear image of a single snowflake in 1885 and many more images in the following years.
By 1931, when his book was published, it included over 2,400 images of snowflakes. Based on the distinct structures/patterns of these images and many others from other works, scientists concluded that no two snowflakes are completely similar.
* Through his work, Bentley came to the realization that temperature and air currents in the clouds influence the shape and size snowflakes.
Snowflakes Magnified
Studying snowflakes may prove challenging due to the fact that they can be easily damaged at certain temperatures. For this reason, they have to be maintained at temperatures below 32 degrees Fahrenheit (below 32 °F) in order to prevent melting. To study the general shape/structure of a snowflake, a number of techniques can be used.
Magnifying Glass
Before inspecting the shape/structure of a snowflake under the microscope, you can use a magnifying glass to observe and record your observation.
Requirements
- Magnifying glass
- Black paper or card (you can use a black card stock or a piece of black construction paper)
Procedure
When it starts snowing, go out and hold up your paper in order to catch a few snowflakes
Immediately use your magnification glass to observe several snowflakes and record your observation.
* Given that using a magnification glass requires you to hold it close to your eye, make sure to cover your nose and mouth in order to avoid breathing on the snowflakes (otherwise, they would melt as a result of warm breath)
Observation
Under the magnifying glass/lens, you may notice distinct patterns between different snowflakes. Although the shape between different snowflakes may vary, they all present a symmetrical shape.
Preserving a Snowflake
As mentioned, a snowflake can easily melt at temperatures above 32 °F. For this reason, you may want to preserve the impression of a snowflake for future references. These can then be observed using a magnifying glass or a microscope. The following are some of the methods that can be used to preserve a snowflake (impression of a snowflake).
Using Hair Spray or Acrylic
Requirements
- Glass slide
- Hairspray
- A box
Procedure
· Spray hairspray or acrylic on a clean glass slide
· Hold up the sticky surface of the glass slide to catch the falling snowflakes
· Once a few snowflakes are trapped on the slide, place the slide in a box (in a cold area) for a few hours - This will allow the spray to dry as the water in the snowflake melts and disappears
· Observe the slide using a magnifying glass as well as a microscope and record what you observe
Apart from hair spray, you can also use a weak solution of polyvinyl plastic to preserve a good impression of a snowflake. For this experiment, start by chilling the solution to about 2 degrees below the freezing level. Once the solution is chilled, paint a thin coat of the solution onto a clean glass slide and then chill/freeze the slide.
When it starts to snow, place the slide outside (with the painted surface facing up) and allow it to catch a few snowflakes. Place the slide in a cold area for about 10 minutes to allow the solvent to evaporate. You can then warm the slide to melt the snowflake and allow water to evaporate (this can be done at room temperature).
Using non-gel Superglue
By using the techniques mentioned above, you will be able to preserve a perfect impression of a snowflake. However, you can also preserve an actual snowflake using non-gel superglue. This technique will allow you to preserve a snowflake for a long period of time.
Requirements
- Thin and runny (non-gel) superglue e.g. pure cyanoacrylate
- Microscope glass slides
- Coverslips
- Pair of tweezers
- Paintbrush
Procedure
· Before anything, chill the microscope glass slide, coverslip, superglue, and tweezers at 20°F. This may be achieved by putting them outside when it starts snowing and when the temperature is about 20°F or lower or simply place them in a freezer - This is an important step that will keep these materials cold and prevent them from warming up and melting the snowflakes
· To catch the snowflake, you may use a black/dark paper or cardboard or simply place the glass slide out when it's snowing. However, collecting snowflakes on a dark paper will allow you to pick/select which you prefer for preservation
· If you collected snowflakes on the glass slide, then adding glue is the next step. However, if you collected the snowflakes using a black paper, then gently use a paintbrush or using cold tweezers to collect the snowflake and place it on the slide (During this step, make sure not to breathe on the snowflakes to prevent melting. You can cover your mouth and nose using a scarf for this)
· If you had prepared several glass slides, then place a single snowflake (gently to avoid damaging the structure of the snowflake) at the center of each glass slide
· Once the snowflakes are well positioned on the slides, gently add a small drop of superglue onto the snowflake so that you cover the snowflake with the glue - This should be done quickly to avoid warming the glue which can affect the final results
· Gently lay a cover slip on the snowflake. To avoid trapping air bubbles, gently lay the coverslip at an angle - You can try using the cold tweezers here to avoid heating up the glass coverslip
* You can repeat this procedure with several snowflakes to prepare several slides.
Lastly, store the slide(s) horizontally in a freezer (for about 2 weeks). This will allow the glue to harden properly and thus perfectly preserve the snowflakes.
* Snowflakes may appear white in color or transparent.
StereoMicroscopy
The slides prepared using the methods above can be viewed using a stereo microscope to get a closer look at the snowflakes. Here, a digital microscope camera can also be used to capture images of the slide.
Requirements
- Prepared slides
- Stereomicroscope
Procedure
· Gently turn the revolving turret to set the lowest power objective lens into position
· Carefully place the slide on the stage and hold it in place with the clips
· Look through the eyepiece and gently move the focus knob until the image comes into focus (until you get a clear image)
· Move the microscope slide around (by adjusting the stage) to observe all parts of the snowflake structure
· Record what you observe
* If the snowflake was not preserved using the methods above, then make sure that all the equipment used to investigate the slide are very cold (freezing is possible) so that you can observe the snowflake before it melts.
Observation
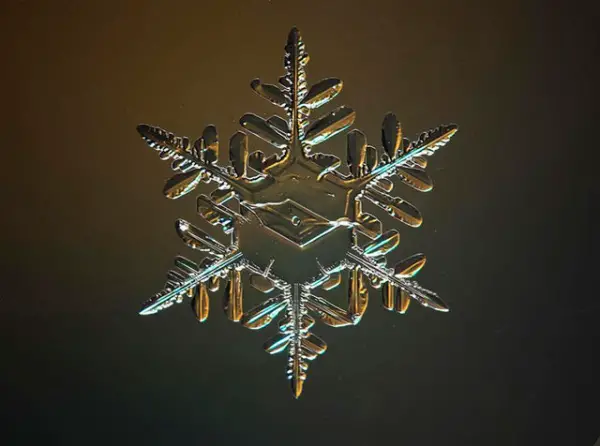
Under a stereomicroscope, it's possible to observe the intricate patterns of each snowflake. By comparing different slides (if you prepared several slides), you will notice several differences between these patterns. Despite the differences, you will notice that all the snowflakes have six sides forming a hexagonal structure. This is due to the manner in which the molecules join as they form a snowflake.
How a Snowflake is Formed
The structure of a snowflake under a microscope is observed as having formed through two main steps/phases: The first step involves the formation of a six-sided crystal structure (facet) while the second phase involves the growth of the branches on the surface of the facet.
The formation of a snowflake starts when cold water molecules (in the cloud) come into contact with a dust particle or pollen and freeze. Here, the dust particle/pollen is the crystallization nucleus acting as the foundation on which a snowflake is formed. This being the first step of snowflake formation, it produces the simple hexagonal plate/facet also referred to as a diamond dust.
As this structure falls through the cloud, latent heat travels outward from the center causing the crystal to destabilize. Although molecules that loosen up start moving away from the surface of the crystal, they are held by surface tension and thus cannot escape.
Tthey provide a good surface on which other water molecules are gathered and added onto the crystal. This increases the general surface area thus allowing the growing snowflake to catch more molecules and grow in size.
* Several flakes may attach to form a large snowflake.
* A single snowflake consists of several ice crystals sticking together.
* Apart from pollen or dust, some snowflakes have been shown to contain bacterial cells or fungi
Classification
While no two snowflakes are completely alike (due to varying atmospheric conditions and the random manner in which water molecules are added to the crystal), scientists have attempted to group them into several categories.
Based on the 1951 system, snowflakes are into the following categories/groups:
· Plates - characterized by six-sided flakes
· Stellars - characterized by six-pointed flakes
· Columns - consist of rectangular crystals
· Capped columns - columns with a bar on either end
· Needles - have splinter-like crystals
· Irregular crystals - lack a regular shape because crystals are clumped together in an irregular manner
Return to Beginner Microscope Experiments
Return to "What looks Cool under a Microscope?"
Return from Snowflakes under a Microscope to MicroscopeMaster home
References
Brian J Ford. (2014). The Hidden Secrets of Snowflakes.
Flinnsci. Preserve a Snowflake: A Winter Student Activity.
Michael Allaby. (2014). Blizzards.
Michael I Selzer. (2014). Kepler's Snowflake and other Morphological Musings.
Tsuneya Takahashi and Norihiko GFukuta. (1987). Ice Crystal Replication with Common Plastic Solutions.
Links
https://weatherology.com/articles/155/The+Science+Behind+the+Snowflake.html
https://scijinks.gov/snowflakes/
Find out how to advertise on MicroscopeMaster!
